
Installation User manual Tracks Routes POI FAQ Customization Projections and datums Forums Known bugs Map Conversion How-To Libraries Changelog Links Help this project Contact Credits
User Manual
Summary
- Starting ttMaps
- Display of the map centered on the current position
- Browsing a map
- Display of the altitude, time, north of the map and scale
- Main Menu
- Maps browsing menu
- Browse the maps around a city
- Browse maps from a postcode
- Browse maps from geographical coordinates
- Setup menu
- Status menu
- Display Preferences
- Maps management menu
- List and characteristics of maps
- Adjustment of the calibration of a map set
- Tracks
- Routes
- Points of interest
Starting ttMaps
To start ttMaps, simply press the icon that was created in the main menu of TomTom:

A few seconds later, the ttMaps splash screen appears:

At first use, or if you have deleted manually the maps index file (maps.idx), the maps are automatically indexed. A progress bar will appear at the bottom of the screen:

After the splash screen, if the GPS position is known, ttMaps displays a map centered on this position:

Otherwise, the GPS status screen is displayed until the GPS has determined the current position:
Display of the map centered on the current position
When the position is known, ttMaps displays a map centered on the current position. This position is marked by a red reticle (cross). Several buttons are active (nine maximum). These buttons are superimposed on the map, unless you've disabled this function in the menu preferences. They can be used to browse the map, zoom, and change the map series if you have installed several.
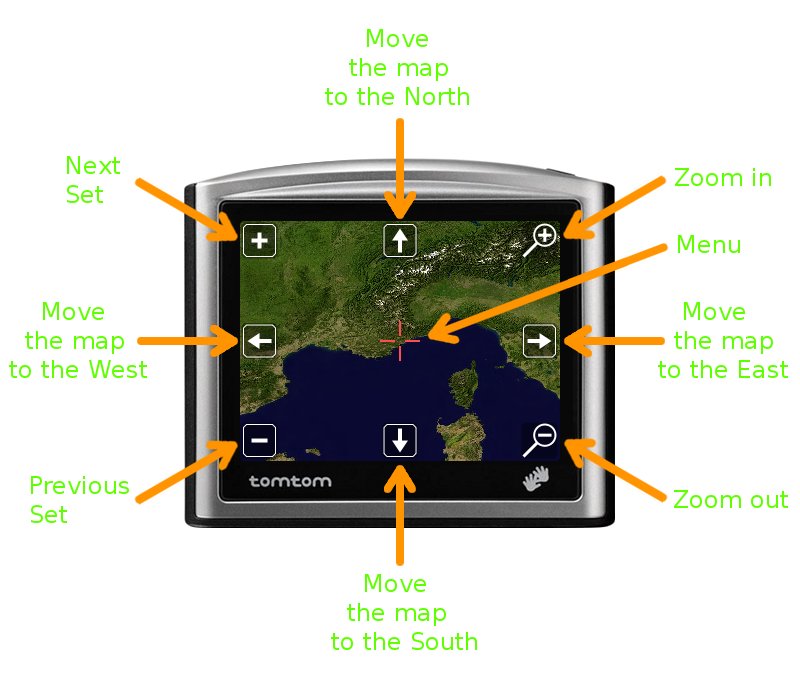
| Button | Function | Notes |
|---|---|---|
| Zoom + | Zoom in the map | This button is not displayed if the zoom is at its maximum level |
| Zoom - | Zoom out of the map | |
| Set + | Display next map | This button is not displayed if there is only one map |
| Set - | Display previous map | This button is not displayed if there is only one map |
| Move the map to the North | Move the map to the North | |
| Move the map to the South | Move the map to the South | |
| Move the map to the East | Move the map to the East | |
| Move the map to the West | Move the map to the West | |
| Reticle | Access to the main menu |
Note: If the GPS does not correctly receive the satellites anymore, the map freezes on the last known position, and is displayed in black and white, until the TomTom receives the GPS signals properly again.
Browsing a map
When you use the buttons to browse a map, the display no longer corresponds to the current position. The reticle disappears and is replaced by an empty button. Press this button to return to the display of the current position:
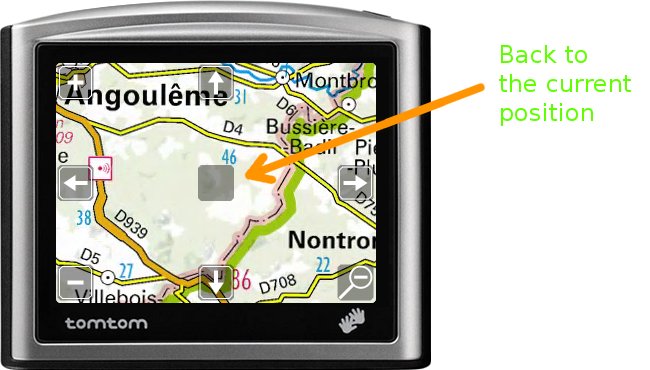
Note on this screenshot that the Zoom+ button is not displayed, as the zoom is at its maximum level.
You can also drag the map with your finger or stylus. To do this:
- touch the screen (out of the buttons);

- after a half-second, the buttons disappear;

- then you can drag the map by moving your finger;
- when you reach the desired position, remove your finger;

- the full menu and the buttons are displayed.
Display of the altitude, time, north of the map and scale

Four indications can be displayed on the map:
- At the top left: the altitude provided by GPS. It disappears when browsing the map
- At the top right: local time (if you have set up the time zone)
- At the bottom left : the north of the map, materialized by a compass. Depending on the projection and place, the top of the screen may not exactly be directed towards the north.
- At the bottom right: the map scale, in meters or degrees, according to the projection used.
These displays are optional. They can be deactivated in the setup menu.
Main Menu

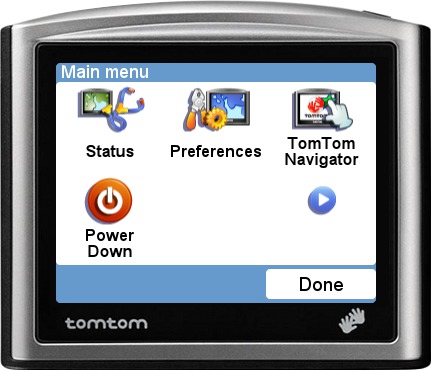
| Button | Function | Notes |
|---|---|---|
| Browse Maps | Maps browsing | |
| Tracks | Tracks management | |
| Routes | Routes management | |
| Points of interest | Points of interest management | |
| Navigate to ... | Navigate to a point | Shortest path (great circle) |
| Status | Informations about the TomTom status | |
| Preferences | User preferences | |
| TomTom Navigator | Back to the TomTom road navigator | May require a reboot if the TomTom software version is 8.20 or higher |
| Power Down | Power off the TomTom | Works only with TomTom software versions below 8.20 (The pushbutton puts the TomTom in sleep mode) |
Maps browsing menu

| Button | Function | Notes |
|---|---|---|
| Point of interest | Displays the map centered on a point of interest | |
| POI near you | Displays the map centered on a point of interest | POIs are sorted by increasing distances |
| City | Display the map centered on a city | |
| Postal Code | Display the map centered on a city whose postal code is known | |
| Latitude and longitude | Display the map centered on geographical coordinates |
Browse the maps around a city
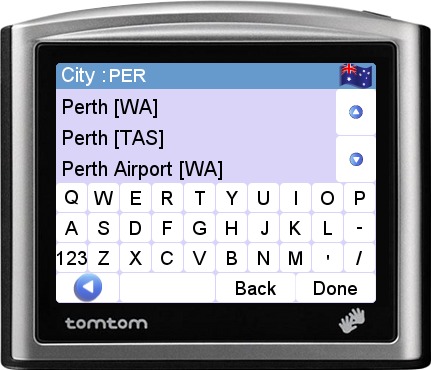
Select the country by clicking on the flag, the enter the name of the city. Whenever you type a letter, a list of cities whose name match is displayed. You can browse the list using the vertical arrows. As soon as the city sought appears, select it.
Browse maps from a postcode


Select the country by clicking on the flag, then enter the postal code. Whenever you type a number, a list of cities whose code match is displayed. You can browse the list using the vertical arrows. As soon as the city sought appears, select it. A postal code may correspond to several municipalities.
If your postcode include letters, press "ABC" to switch to the alphabetic keyboard. You can swicth back to the numeric keyboard by pressing "123".
Browse maps from geographical coordinates
Three formats are supported for the geographic coordinates:
- Decimal degrees: 43.456°
- Degrees, decimal minutes: 56°23.56'
- Degrees, minutes and decimal seconds: 56°23'38.624"
Coordinates must be postfixed by the letter indicating the hemisphere (N or S for latitude, E or W for longitude). Start by entering the latitude:

Press Done, and type the longitude:
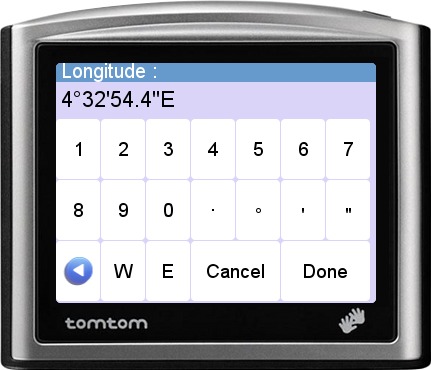
Finally press Done to display the map.
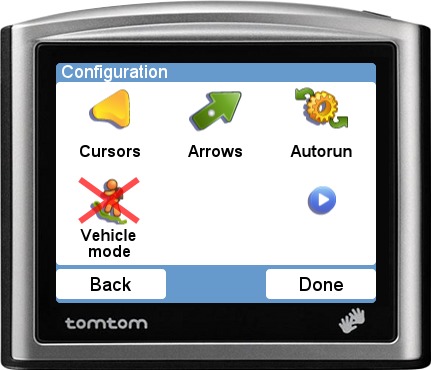
Setup menu


| Button | Function | Notes |
|---|---|---|
| Change Mode | Select the type of use | Biking, Driving, Flying, Hiking, Sailing.conf or custom mode |
| Turn on/off sound | Turns on or off the sound alarms | |
| Route alarm parameters | Change the route alarm parameters | |
| Display preferences | Select items to show | |
| Power saving | Selection of the screen saver delay, if the TomTom runs on battery | |
| Low battery preferences | Selection of the battery alarm level | |
| Manage Maps | List and indexing of maps | |
| Take screenshot | Select/Unselect the screenshot mode | Take screenshots with the ON/OFF button. The screenshots are saved in the Photos directory of the TomTom |
| Volume Preferences | Sound level adjustment | |
| Brightness | Set the brightness of the screen | |
| Language | Selection of the user language | |
| Keyboard configuration | Selection of the keyboard layout (AZERTY, QWERTY) | |
| Time zone | Selection of the time zone to display the local time | |
| Automatic recording / Manual recording | Automatic recording (or not) of the track when ttMaps starts | |
| Units | Selection of the units | Meters-Feet-Miles, Knots-MPH-km/h, ... |
| Cursors | Selection of the cursors showing the direction of movement | |
| Arrows | Selection of the directional arrows | |
| Autorun | ttMaps will start automatically when the TomTom is powered on | |
| Pedestrian mode / Vehicle mode | Type of GPS use (static navigation) | For SiRF GPS only |
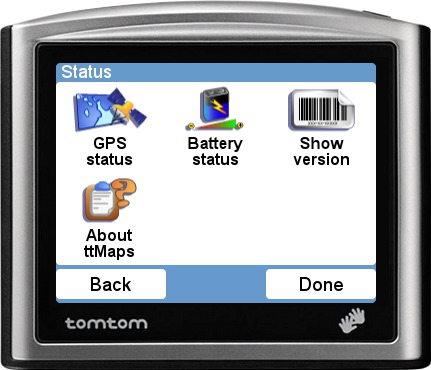
Status menu
| Button | Function | Notes |
|---|---|---|
| GPS Status | Displays the status of the GPS | |
| Battery Status | Displays the current charge level of the battery | |
| Show version | Display the model and the software version of the TomTom | |
| About ttMaps | Display the version number of ttMaps |
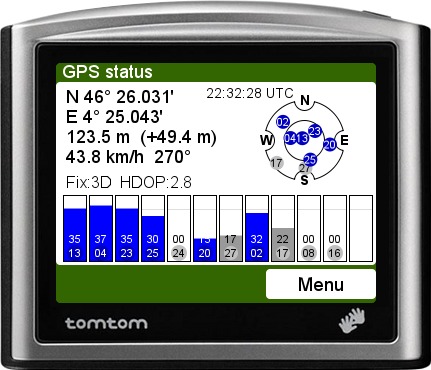
GPS status
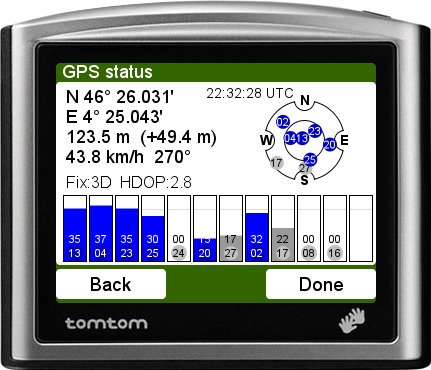
This screen shows:
- the geographical coordinates
- the altitude provided by GPS (+the geoid height)
- the speed and heading
- the quality of positioning (fix 2D/3D and HDOP)
- the GPS time
- For each satellite received:
- its number
- its position on a graph representing the sky
- the level of signal reception, in dB
- if it is taken into account in calculating the position (Blue = yes, Gray = no)
Battery status
When the TomTom is powered by the internal battery, the charge level can be displayed :
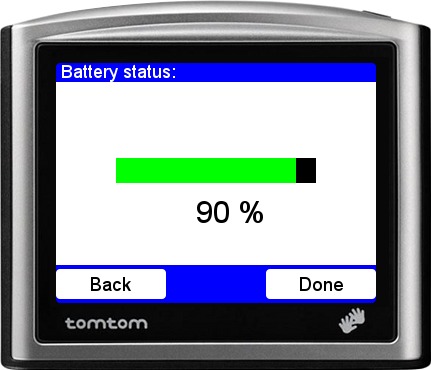
If an external power supply is connected, the charge curent is displayed.
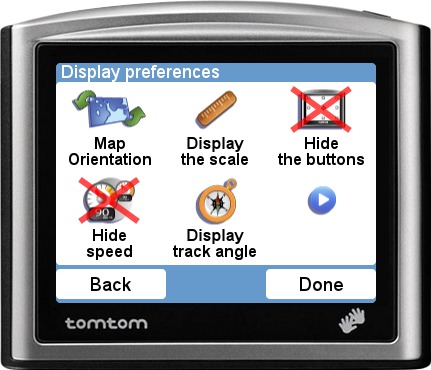
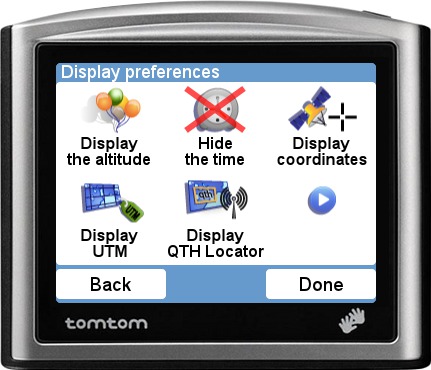
Display Preferences
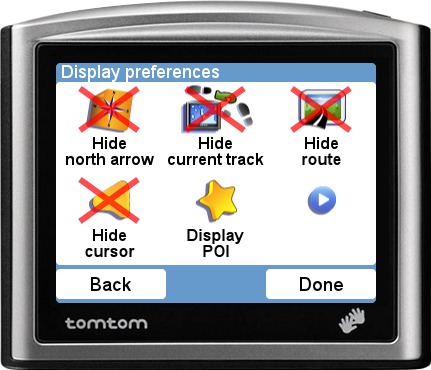

| Button | Function |
|---|---|
| Map Orientation | Selection of the map orientation |
| Show / Hide the scale | Turns on or off the display of the maps scale |
| Show / Hide the buttons | Turns on or off the display of the navigation buttons on the maps |
| Show / Hide speed | Turns on or off the display of the speed |
| Show / Hide track angle | Turns on or off the display of the track angle (direction of movement) |
| Show / Hide the altitude | Turns on or off the display of the current altitude |
| Show / Hide the time | Turns on or off the display of the local time |
| Show / Hide coordinates | Turns on or off the display of the geographic coordinates |
| Show / Hide UTM | Turns on or off the display of UTM coordinates |
| Show / Hide QTH Locator | Turns on or off the display of the QTH Locator (amateur radio) |
| Show / Hide north arrow | Turns on or off the display of the north of the map |
| Show / Hide the current track | Turns on or off the display of the current track |
| Show / Hide the route | Turns on or off the display of the selected route |
| Show / Hide the cursor | Turns on or off the display of the cursor showing the heading |
| Show / Hide the POIs | Turns on or off the display of the Points Of Interest |
| Display POI categories | Select the POI categories to display |
| Show / Hide bat. status | Turns on or off the display of battery level |
| Show / Hide rec. status | Turns on or off the track recording indicator |
Note : Since ttMaps can only display four values simultaneously, some options are mutually exclusive.
Maps management menu
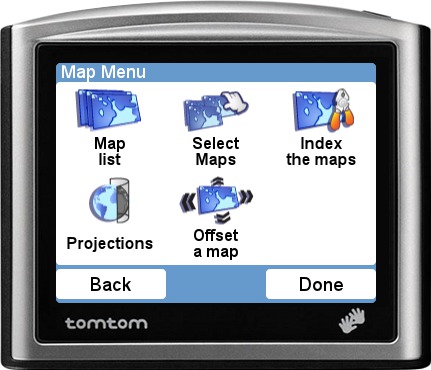
| Button | Function | Notes |
|---|---|---|
| Maps list | Displays the list of maps sets | |
| Select Maps | Select active maps | |
| Index maps | Indexation of the maps | To do after each addition or deletion of maps |
| Projections | Displays the list of currently supported projections | For information |
| Offset a map | Ajust the calibration of a map set |
List and characteristics of maps
Firstly, select the series of maps you want to consider:

Then select the tile:

For each tile are displayed:
- the name of the tile
- the datum
- the projection
- the size in pixels
- the geographical extents expressed in projected coordinates
- the unit of the coordinates

Adjustment of the calibration of a map set
Sometimes, when using large-scale maps, the cumulative errors of the map calibration and the GPS error cause a shift of the track compared to the paths shown on the map. This function allows adjustment of the map calibration for a better match to the field. This adjustment is specific to each set of cards; it is not saved when leaving ttMaps, since the largest error is often due to GPS, and it varies over time.
To adjust the calibration, use the arrows left, right, up and down to match the track with the map. The two screenshots below show the initial state, and what can be achieved after the adjustment.


Tracks
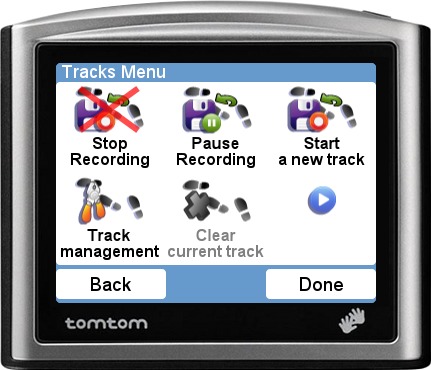
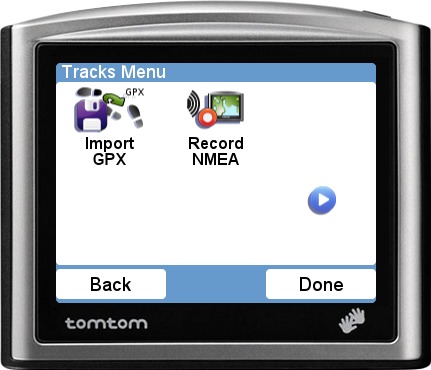
| Button | Function |
|---|---|
| Start recording / Stop recording | Starts or stops the track recording |
| Pause recording / Restart recording | Temporarily suspends the track recording |
| Start a new track | Close the current track and start a new one |
| Tracks management | Tracks list, display, rename, delete or merge |
| Import GPX | Import a GPX file placed in the Tracks folder |
| Clear current track | Remove the current track from the TomTom memory |
| Record NMEA | Record the NMEA stream in the file nmea.txt |
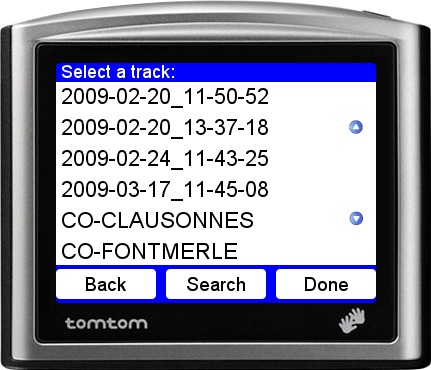
When you click on the Tracks management icon, the tracks list appears:
After having selected a track, the tracks management menu is displayed:


| Button | Function | Notes |
|---|---|---|
| Show the track | Show the full track | |
| Replay the track | Replay the track in real time | |
| Export to GPX | Create a GPX file in the Tracks file | |
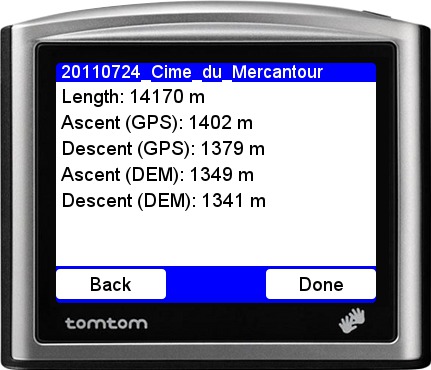
| Track Infos | Length, Ascent, Descent | |
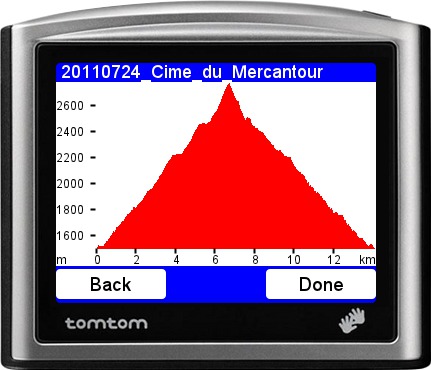
| Track Profile | Graphical display of the track profile | |
| Rename the track | ||
| Merge with a track | Merge two tracks into one | The name of the new tracks is made from the name of the first one and of the suffix _M |
| Split a track | Split a multi-segment track into several tracks | |
| Delete the track | Warning: The deletion is definitive |
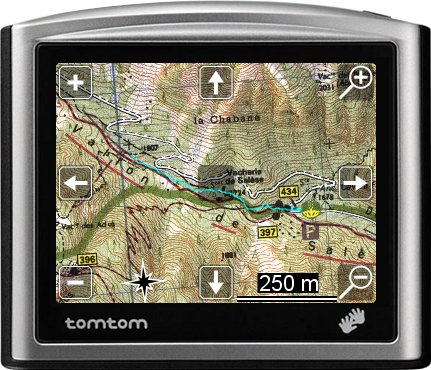
Here is an example of the track display:
and an example of track replay:

The arrows allow to change the speed of the replay, backward or forward.
Track infos
ttMaps can display some information about the tracks, but it is still in experimental state. If you find that the result is wrong, please contact me.
Routes
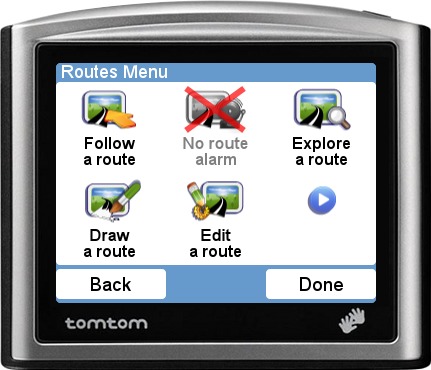
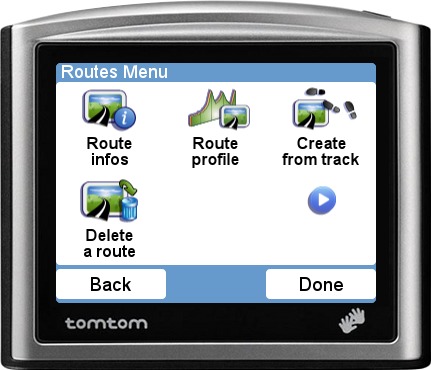
| Button | Function |
|---|---|
| Follow a route | Select the route to follow |
| Route Alarm | Enable/Disable the route alarm |
| Explore a route | Show a map centered on the route |
| Draw a route | Draw a new route |
| Edit a route | |
| Route infos | Display informations about a route (length, ascent, descent) |
| Route profile | Display the profile of a route |
| Create from track | Transform a track into a route |
| Delete a route | Remove a file containing a route |
When exploring a route, it is possible to zoom, change or move the map :

Points of interest


| Button | Function | Notes |
|---|---|---|
| POI Information | Displays the POI coordinates | |
| Add a POI | ||
| Rename a POI | ||
| Delete a POI | ||
| Import OV2 file | ||
| Export OV2 file | ||
| Import GPX file | Import a POI file in GPX format | The file must be put in the ttMaps/POI directory |
| Export GPX file | Export all the POIS from a category into a GPX file | The GPX file will be created in the ttMaps/POI directory |
| Add category | Add a new category of POI | It is possible to use a custom icon. Its name must be category.png and it must be put in the ttMaps/POI directory |
| Remove category |
If the display of POIs has been activated in the "Display POI" menu, and the display of the category has been activated in the "Display POI categories" menu, the POIs are displayed as icons corresponding to their category (or as a blue and orange dot if no icon has been installed for the category) :

Addition of new POIs
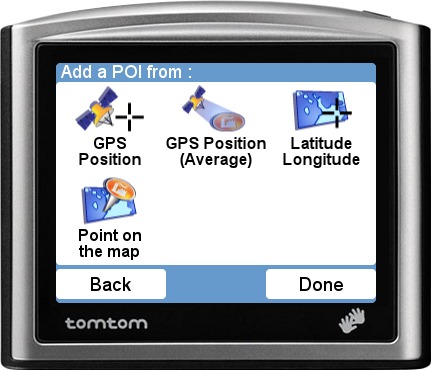
This menu allows you to add points of interest in various ways :
| Button | Function | Notes |
|---|---|---|
| GPS Position | The GPS coordinates are used | |
| GPS Position (Average) | The averaged GPS coordinates are used | |
| Latitude/Longitude | Manual input of coordinates | The altitude is optional |
| Point on the map | Select a point on the map |
Note : The altitude can be defined relative to the ellipsoid, or the geoid (Median Sea Level, or MSL). It is not mandatory.
The screenshot below shows how to add a POI on the map. A blue and orange dot is shown when one press the screen. It can be moved until the position is correct. Then, press the center of the screen to validate the position.

Last modification : 07/01/2013